How to Build a Paver Patio for Beginners
Learn how to build a paver patio for beginners, including layout, excavation, base depth, bedding sand, paver patterns, drainage, and finishing tips.
By Home Crane Editors. . 20 min read.
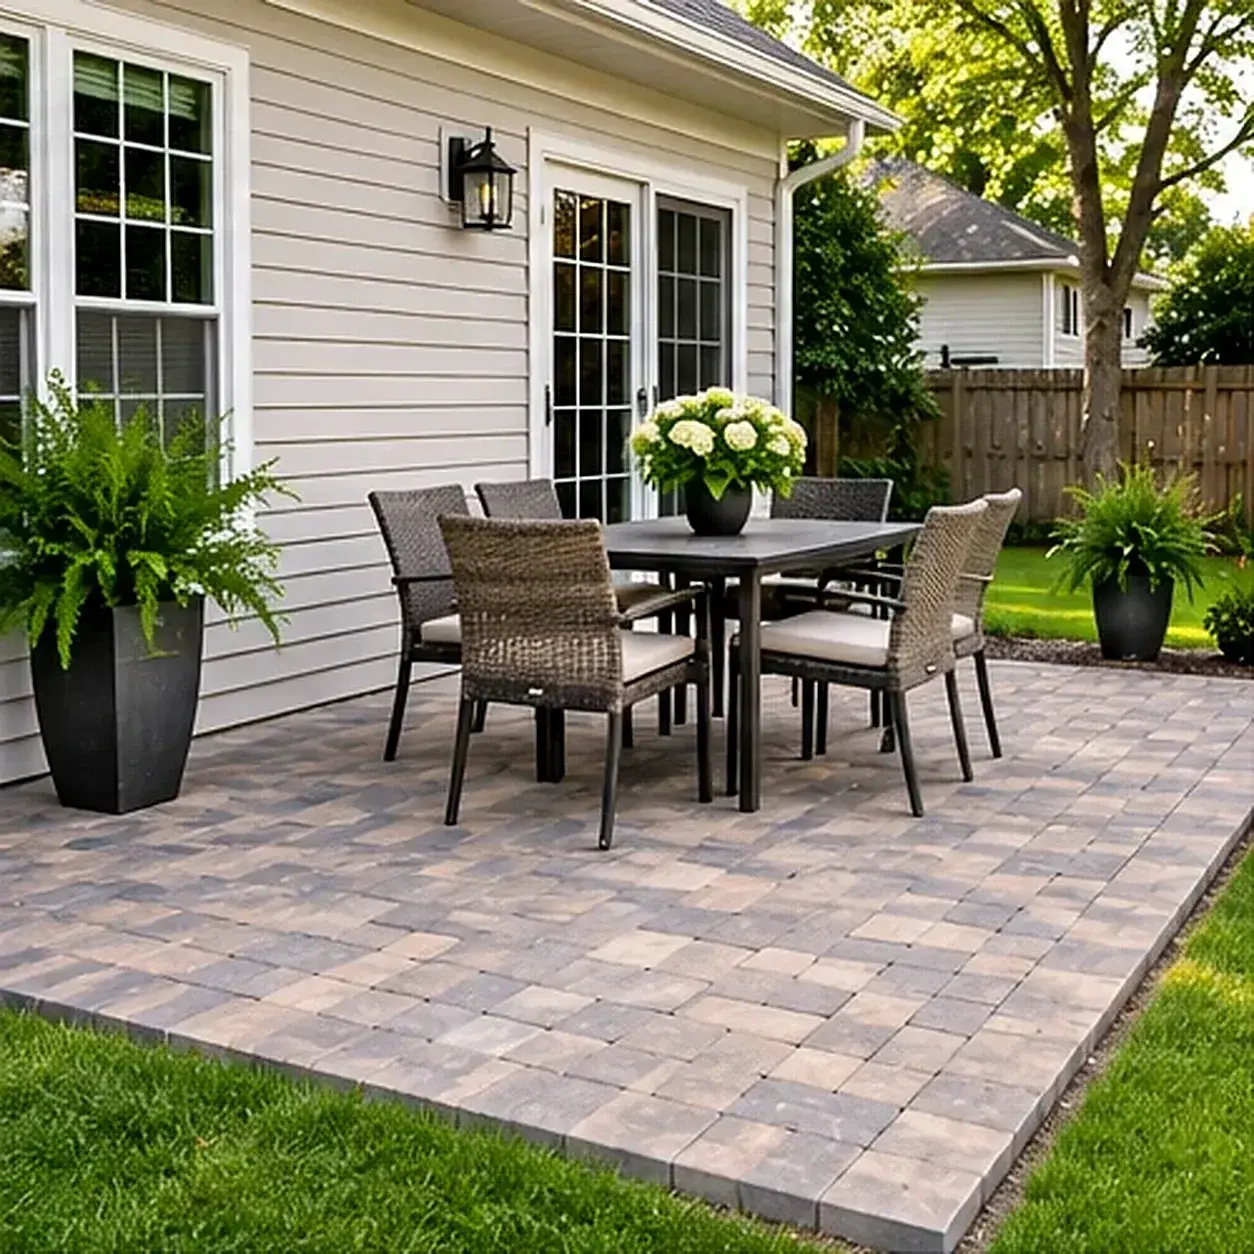
A paver patio can turn an underused patch of lawn into a practical place for outdoor meals, a pair of lounge chairs, or a small seating area. It is also a project where careful preparation matters much more than rushing through the visible paving. The pavers sit on a compacted foundation, and even attractive stones can become uneven when the soil, base, drainage, or perimeter support is poorly prepared. This beginner-friendly guide explains the planning, materials, installation sequence, and common mistakes involved in building a pedestrian patio with concrete pavers.
What a Beginner Should Know Before Starting
A straightforward, ground-level patio can be a manageable home improvement project for an experienced adult who has the time, help, and appropriate equipment. It is not automatically a one-day job. Excavation, moving aggregate, compacting, handling pavers, and making accurate cuts can be physically demanding. A larger patio, a steep or unstable yard, a retaining wall, steps, a pool surround, a driveway, or a site with drainage problems calls for a qualified hardscape professional or other appropriate specialist.
This guide is for a simple pedestrian patio built with compatible concrete pavers on a compacted aggregate base. It is not a design for vehicle loads, a retaining wall, a raised deck, or a permeable-paver stormwater system. Follow the paver manufacturer's installation instructions and local requirements. Paver thickness, bedding material, base depth, joint width, and compaction method can change with the product and the site.
Before any excavation, contact 811 in the United States and follow your state's notification schedule. Wait until the required utilities have responded and the markings are clear. The public utility locate service may not identify private lines such as irrigation pipes, landscape-lighting cables, invisible fences, or lines serving detached structures. Arrange for those to be identified separately. Never guess where a buried service runs, and do not dig through a marked utility zone.
Also check local building or zoning requirements, HOA rules, property boundaries, easements, and any stormwater restrictions. A low patio may not require a building permit in some places, but that is not universal. A project that changes grading, blocks an easement, affects a drainage swale, or adds a retaining structure can have different requirements. Confirm the rules with the local building department before ordering materials.
Understand the Layers Under a Paver Patio
A conventional flexible paver patio is a layered system. From the bottom up, it generally consists of firm compacted soil, a compacted crushed-stone base, a thin bedding-sand layer, pavers, and jointing material. Edge restraints keep the perimeter from spreading. Each layer has a different purpose, so substituting one kind of sand or gravel for another can undermine the installation.
| Feature | Typical role | Beginner note |
|---|---|---|
| Compacted subgrade | Supports the base | Remove sod, roots, and soft topsoil. |
| Crushed aggregate base | Provides the structural foundation and helps distribute loads | A common pedestrian starting range is 4 to 6 inches compacted, adjusted for soil, frost, drainage, and manufacturer guidance. |
| Bedding sand | Provides a consistent setting bed | Use the specified coarse concrete bedding sand, commonly about 1 inch before pavers are placed. |
| Pavers | Create the finished walking surface | Choose one compatible product and follow its spacing and compaction directions. |
| Jointing sand | Fills the gaps and helps the pavers interlock | Select ordinary or polymeric joint sand compatible with the paver and joint width. |
| Edge restraint | Holds the outside rows in position | Secure it to the compacted base, not just loose soil or bedding sand. |
The Concrete Masonry & Hardscapes Association identifies 4 inches as a minimum base thickness for pedestrian applications under ideal conditions. Weak soil, poor drainage, or freezing conditions can require more depth and a site-specific design. Many homeowner installation guides use a 4-to-6-inch compacted base as a common patio range. Treat that range as a planning starting point, not a guarantee that every yard can use the same section. Ask the paver supplier or a qualified installer to confirm the base for your soil and climate. [1] [2]
Plan the Size, Shape, and Location
Start by deciding how the patio will be used. A small bistro table needs less space than a dining table with chairs that must slide backward. A lounge arrangement needs enough room to walk around the furniture. Measure the furniture you already own, then sketch the layout on graph paper. Include chair pull-back space, door swings, stairs, garden beds, and the path people will take to reach the patio.
For a first project, a simple rectangle is easier to measure, square, excavate, edge, and pave than a curved design with several corners. Straight lines also reduce the number of cuts. A rectangular patio around 10 by 12 feet is a useful example for material calculations, but choose dimensions that suit the site rather than copying a standard size.
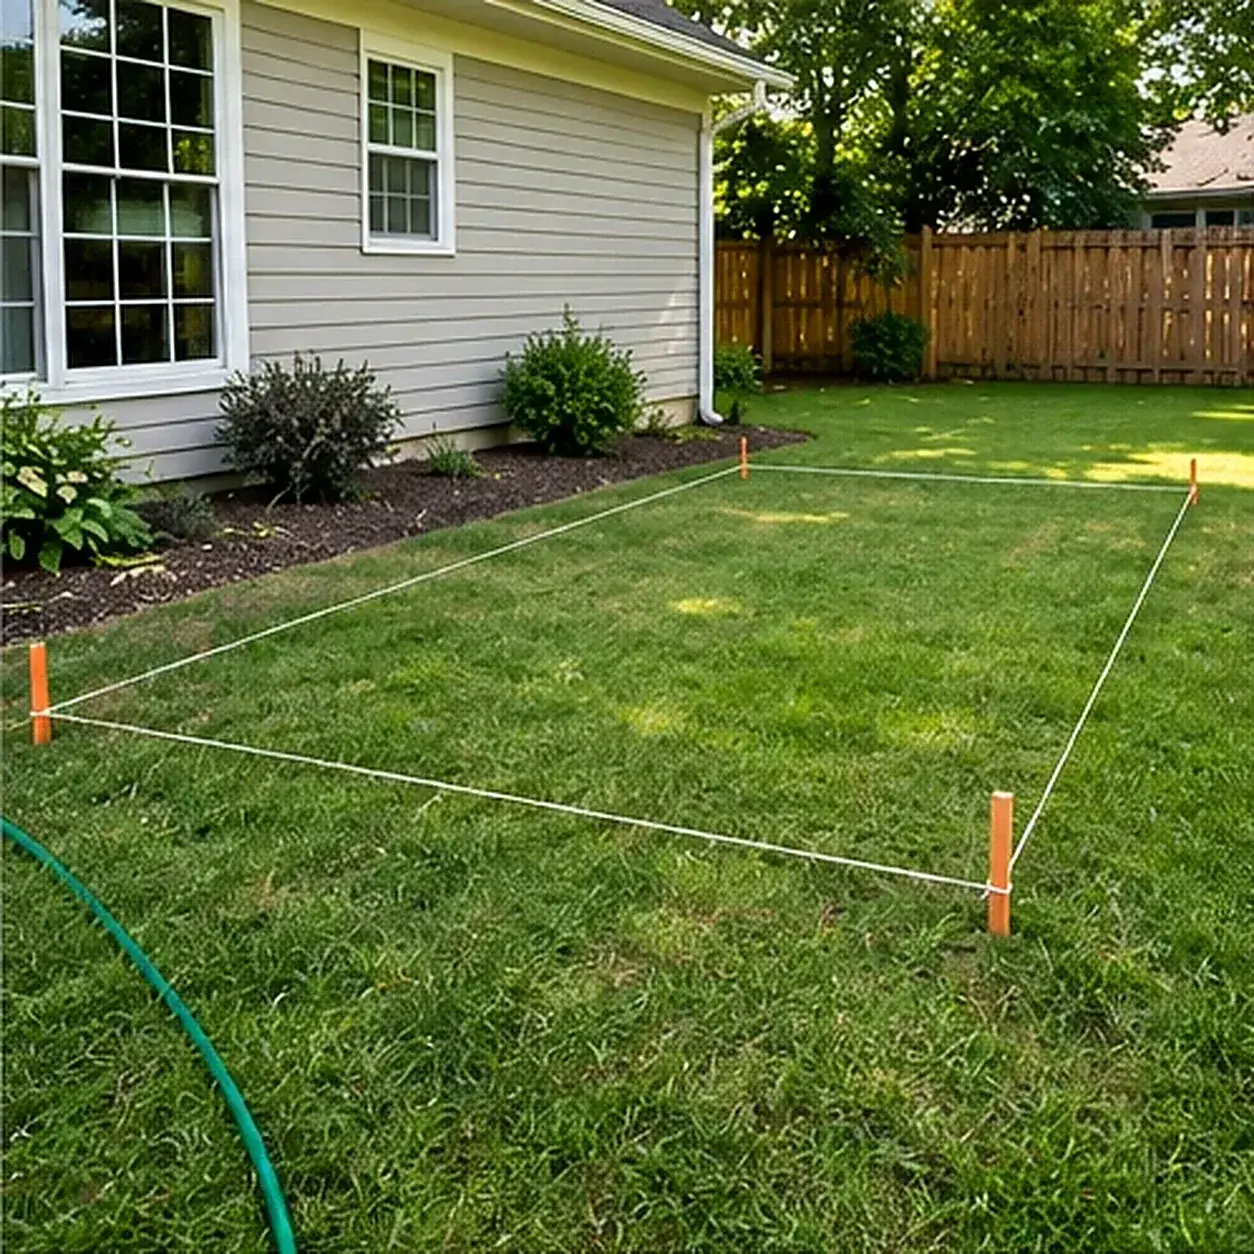
Use a garden hose, rope, or temporary stakes to mark the outline. Walk around the proposed shape and view it from indoors and from the yard. Check that the patio does not cover a drain, septic component, utility access point, tree root zone, or service cover. Keep the finished paving away from siding, vents, door thresholds, and other features that need clearance. Do not raise the patio to a level that traps water against the house.
Establish drainage before you set the height
A patio should shed water instead of directing runoff toward the house, a neighboring property, or a place where it can pool. A commonly used planning range for a hardscape surface is around 1/8 to 1/4 inch of fall per foot, with the actual grade depending on the site, the paving system, and local drainage requirements. Some installation guides use a steeper fall. Do not select a slope by guesswork: check the manufacturer's directions and have a drainage professional review the layout when water already collects near the house or the yard has a complicated grade. [2] [4]
The important point is that the surface, bedding layer, and base should follow a consistent planned grade. A patio that looks level from one side may still send water in the wrong direction. The finished level must also preserve the required clearance at the home's exterior and must not cover weep holes, vents, or other openings.
Calculate the Materials Before You Order
Measure the patio's length and width in feet and multiply them to find the area. For a rectangle that is 10 feet long and 12 feet wide, the area is 120 square feet. Add roughly 5 percent for a simple layout with few cuts. Add closer to 10 percent when the design has curves, many borders, or awkward fitting areas. Confirm the coverage per paver with the supplier because sizes and joint spacing vary.
For the same 120-square-foot example, a 6-inch compacted aggregate base has a geometric volume of about 60 cubic feet, or 2.22 cubic yards, before allowing for the supplier's loose-volume and compaction yield. A 1-inch bedding layer has a geometric volume of 10 cubic feet, or about 0.37 cubic yards. These are planning calculations, not purchase quantities. Ask the aggregate yard how much loose material is needed to produce the specified compacted depth. Do not order only by guessing from the number of bags shown in a small online project.
| Feature | Example for a 10 ft × 12 ft patio | What to confirm |
|---|---|---|
| Patio surface | 120 sq. ft. | Finished dimensions and border layout |
| Pavers | About 126 sq. ft. with 5% allowance | Coverage per unit, pattern, cuts, and color blend |
| Aggregate base | 60 cu. ft. compacted at 6 in. depth | Delivered loose volume and site-specific depth |
| Bedding sand | 10 cu. ft. at 1 in. nominal depth | Product specification and supplier quantity |
| Joint sand | Product coverage for 120 sq. ft. | Joint width, paver type, and bag coverage |
| Edge restraint | Measured patio perimeter | Product type, corners, stakes, and fastening method |
A 10-by-12-foot rectangle has a 44-foot perimeter. Add the measured length of any internal border or transition that needs restraint. The amount of paver material depends on the actual pattern. Order from the same production lot when possible, and ask the supplier how to blend units from multiple bundles to reduce visible color blocks.
Materials and Tools Checklist
Typical materials include concrete patio pavers, dense-graded crushed aggregate suitable for compacted paving bases, the specified coarse bedding sand, compatible joint sand, edge restraints, and the approved stakes or fasteners. A separation geotextile may be appropriate for some soils or designs, but it is not a universal substitute for correcting soft, wet, or unstable ground. Ask the supplier or installer whether it is suitable for the site. Do not use loose topsoil, pea gravel, play sand, or an unspecified fine material as a replacement for the designed base and bedding layers.
Typical tools include a tape measure, stakes, mason's line, marking paint, a line level or laser level, a straightedge, shovel, rake, wheelbarrow, tamper, and a plate compactor appropriate for the paver system. A screed board and straight screed rails help create a uniform bedding layer. A rubber mallet helps make small adjustments. Cutting may require a masonry saw or paver splitter, depending on the product. Use tools only if the operator is trained to use them and the manufacturer's instructions are understood.
Plan for personal protective equipment. Eye protection, suitable gloves, hearing protection around loud equipment, sturdy footwear, and clothing appropriate to the work help reduce common project risks. Pavers and aggregate are heavy. Arrange suitable help or delivery close to the work area, and avoid attempting lifts that are beyond a person's capability. Have an experienced adult or qualified professional handle excavation machinery, compactors, and powered cutting equipment when needed. OSHA's construction PPE guidance explains why eye, foot, hand, and hearing protection matter around construction tasks. [7]
Step 1: Mark the Footprint and Set the Reference Grade
Mark the patio perimeter clearly and place stakes just outside the planned edge so they will not be in the way during excavation. Stretch mason's line between the stakes. Use a level and measuring tape to establish a consistent fall away from the house or toward the approved drainage destination. Mark the intended finished paver height on the stakes.
Do not assume the existing ground is the correct reference. Measure from fixed points such as the door threshold, foundation, and nearby drain. Check clearances and observe where water travels after a heavy rain. If the planned grade would send runoff into a neighboring yard or toward a basement window, change the layout or obtain a professional drainage plan before building.
Step 2: Excavate to the Required Depth
The excavation depth must allow for the compacted base, bedding sand, and paver thickness while keeping the finished surface at its planned elevation. For example, a paver that is about 2 3/8 inches thick over a 6-inch compacted base and a 1-inch bedding layer requires roughly 9 3/8 inches of construction depth. The actual dig depth can vary because loose aggregate compacts, existing grades vary, and the edge conditions matter. Confirm the section with the product instructions before excavating.
Remove turf, roots, and organic topsoil. The base should rest on firm subgrade, not loose grass roots or a layer of soft fill. Excavate evenly and avoid disturbing the soil beneath areas that are already firm. If the excavation exposes wet, spongy, pumping, or unusually soft ground, stop and have the cause assessed. Simply covering an unstable area with more sand will not solve the underlying problem.
Do not dig until the 811 process is complete and private lines have been considered. Follow the locate marks and the state's tolerance-zone rules. If markings are missing, unclear, or damaged, request clarification or a new locate before proceeding. State requirements and waiting periods differ, so use the instructions from the local one-call center rather than relying on a generic number of hours. [6]
Step 3: Prepare and Compact the Subgrade
After excavation, remove loose debris and rake the soil to the planned grade. Compact the exposed subgrade using suitable equipment and methods for the soil type. Small areas may be prepared differently from a broad patio, and cohesive clay behaves differently from granular sand. The objective is a firm, stable platform that will not continue to settle under normal pedestrian use.
Check the grade with the same string lines or level references used for layout. Look for soft pockets, depressions, and areas where water stands. If a section becomes muddy or saturated, do not bury the problem. Allow conditions to improve, identify the drainage issue, and obtain guidance on whether the subgrade needs repair or a different foundation design. A fabric separator can help prevent certain soils from mixing with aggregate, but it does not make a poorly drained site suitable by itself.
Step 4: Install the Crushed-Stone Base in Layers
Use the aggregate specified for paver bases in your region. Dense-graded crushed stone with a range of particle sizes is commonly used because it can be compacted into a stable layer. The local supplier may use names such as paver base, road base, crusher run, or a regional grading designation. Ask for material intended for a compacted hardscape foundation, not decorative pea gravel.
Spread the aggregate in manageable lifts rather than dumping the full depth at once. Compact each lift according to the material and equipment instructions before adding the next. The right lift thickness depends on the compactor and aggregate, so follow the equipment and material guidance. Keep checking the planned fall as the base rises. A base that is thick at one end and thin at the other will produce an uneven finished surface or create drainage problems.
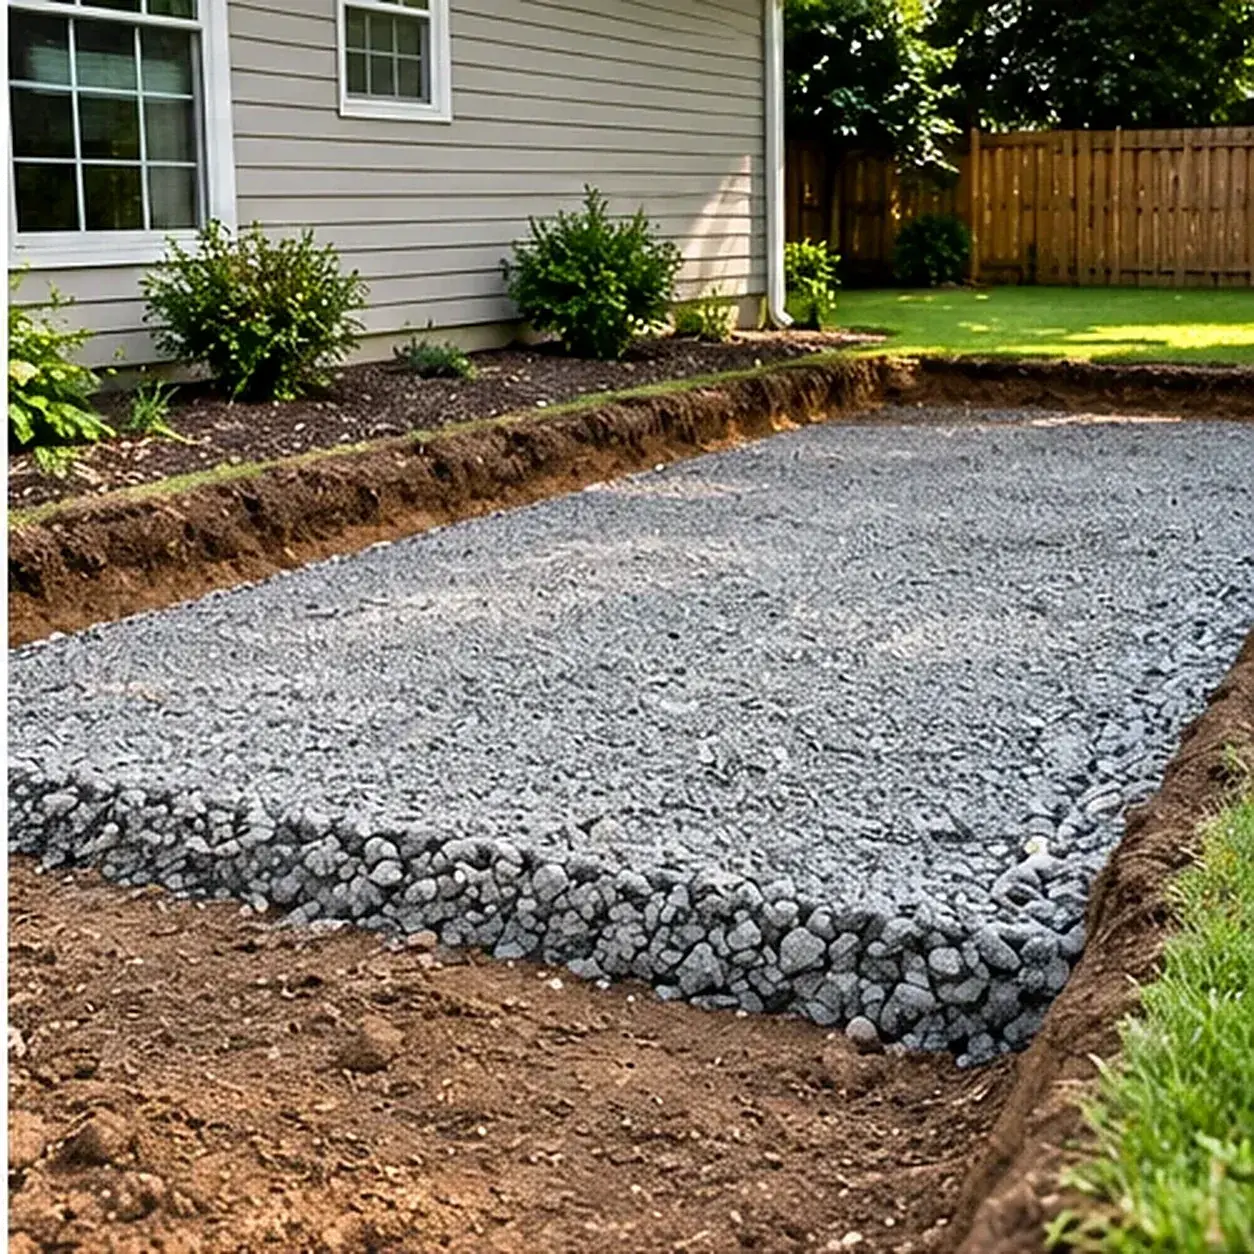
The base should be firm, uniform, and at the correct elevation before bedding sand is installed. Walk the site only when safe and inspect for visible movement, soft spots, or ridges. Rework high and low areas instead of assuming the bedding layer will hide them. Bedding sand is not intended to correct a poorly compacted base or substantial elevation errors.
Step 5: Install the Edge Restraints
Edge restraints are essential because pavers can gradually spread outward if the perimeter is not held in place. Restraint options include purpose-made plastic, metal, aluminum, or concrete systems. The correct product depends on the paving units, the edge location, the base design, and the manufacturer's requirements. A restraint should be supported by the compacted foundation and fastened as specified. Loose soil beside the patio is not a dependable substitute.
Set the restraint at the correct height and alignment. Check corners and long runs with a string line before fastening. Some systems are installed before the pavers; some allow parts of the restraint to be secured after paving. Follow the product instructions. The Concrete Masonry & Hardscapes Association explains that edge restraints provide lateral support and help maintain the interlock of concrete pavers. [3]
Step 6: Screed a Consistent Bedding-Sand Layer
Use the bedding sand specified for your paver system. For conventional concrete pavers, a nominal layer of about 1 inch is common, but the product requirements control. [5] Do not confuse bedding sand with the joint sand that will be swept into the gaps after paving. They perform different jobs and may have different gradations and specifications.
Set two straight screed rails on the compacted base at the same planned elevation. Spread enough sand between them, then pull a straight board across the rails to create an even surface. Remove the rails and carefully fill the narrow tracks they leave without disturbing the surrounding sand. Screed only as much area as can be paved before the bed is disturbed by weather or foot traffic. Avoid walking across the finished bedding layer.
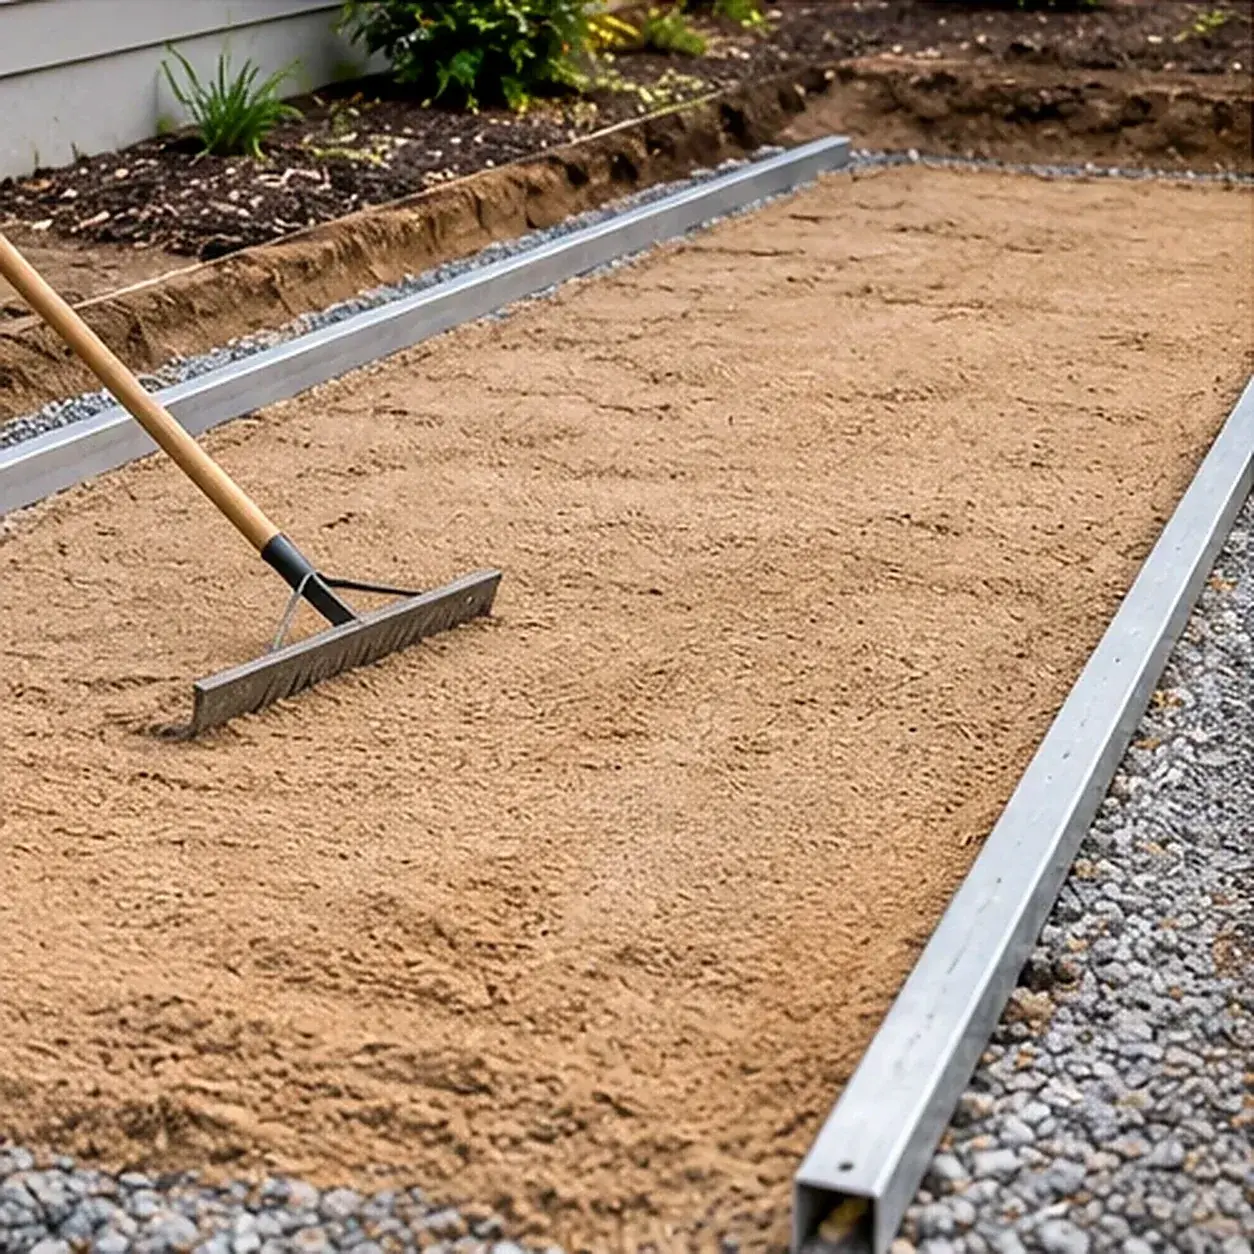
Do not use extra sand to compensate for dips in the base. An uneven or overly thick bedding layer can lead to settlement and rocking. If a section needs correction, return to the base and fix its elevation before screeding again. Keep the sand consistent and avoid allowing it to become saturated or contaminated with soil.
Step 7: Lay the Pavers in a Controlled Pattern
Choose the pattern before you begin. Running bond is straightforward, while herringbone can provide strong interlock and a distinctive look. Modular patterns use multiple paver sizes and need careful planning. The product supplier may recommend particular patterns, edge courses, or minimum cut sizes. Avoid narrow slivers at the edges because they are harder to support and can be more likely to move.
Begin from a straight reference edge or a planned 90-degree corner. Place the pavers onto the screeded bedding layer without dragging them across the sand. Keep joint spacing consistent and use the paver's built-in spacers or the manufacturer's recommended spacing method. Work forward from the installed area so the bedding layer is not repeatedly stepped on. Check alignment with a string line every few rows.
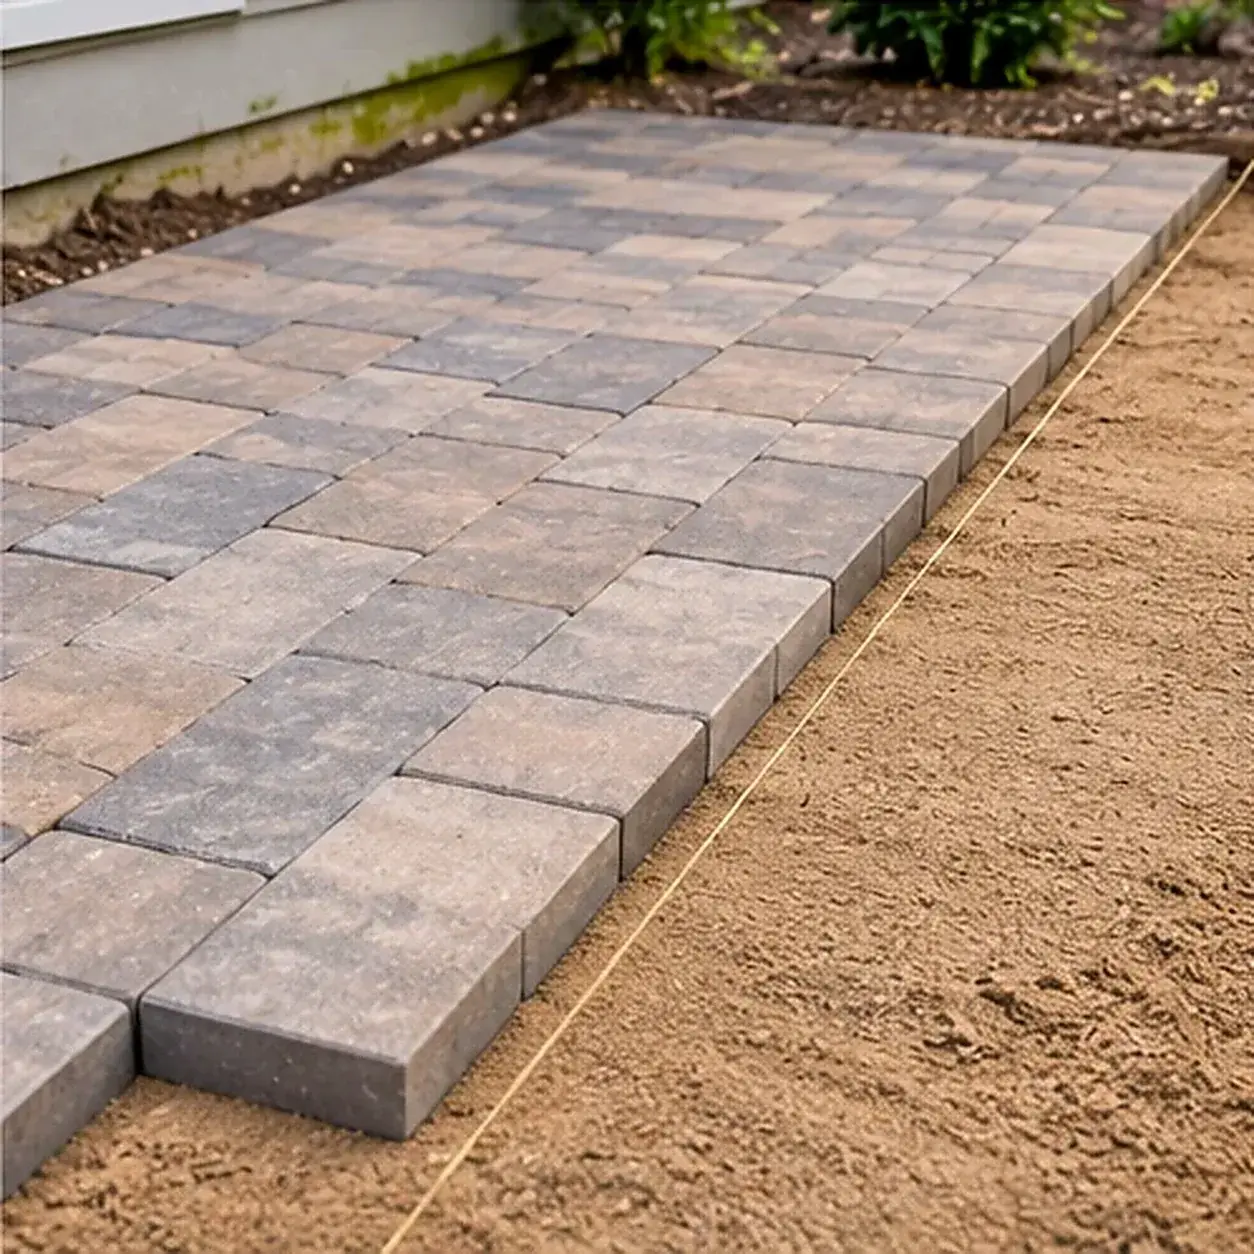
Take pavers from more than one bundle when the manufacturer recommends blending. Color and texture can vary naturally between production runs and pallets. Mixing units as you work helps create a more balanced appearance. Inspect each paver before placing it and keep damaged units aside for a location where the manufacturer allows their use, or return them to the supplier.
Step 8: Make Cuts and Complete the Border
Most rectangular patios still need some fitting around the perimeter, corners, posts, or drainage features. Measure each space carefully and account for the intended joint width. Avoid forcing a full paver into a gap that is too small. The border should look deliberate, with reasonably consistent cut widths rather than a collection of thin scraps.
Cutting concrete or stone pavers can create flying fragments, dust, and noise. The correct cutting method depends on the product and the tool. Use only an approved saw or splitter operated by a person trained to use it, with the correct guard, blade, eye and hearing protection, and dust controls specified by the tool manufacturer. Do not dry-cut a material when the tool or product instructions require wet cutting or dust extraction. If safe cutting equipment and experience are not available, have the supplier or a professional make the cuts.
After the field pavers are placed, finish the perimeter and confirm that the edge restraints are secure. The final border should support the layout without obstructing water flow. Backfill the outside of the restraint with suitable soil or landscaping material only after the edge is stable, and keep the finished grade from covering the restraint in a way that compromises its function.
Step 9: Fill the Joints and Compact as Directed
Jointing sand fills the gaps between pavers and helps the surface act as an interlocked system. Use a joint product compatible with the paver material, joint width, and installation conditions. Ordinary joint sand and polymeric sand are not interchangeable in every application. Polymeric products contain binders and require specific installation and activation procedures. Follow the bag and manufacturer instructions exactly, including temperature, moisture, cleanup, and curing conditions.
Sweep dry joint sand across the surface and work it into the joints. Remove excess material from the paver faces before compaction or wetting. If the paver manufacturer permits mechanical compaction, use the specified plate compactor and protective mat where required to reduce the risk of scuffing or chipping. Some products, such as certain natural stones or textured pavers, may require a different method. Never assume that every patio can be compacted in the same way.
For polymeric sand, keep the surface clean before activation. Follow the product's watering procedure and avoid flooding the joints or leaving residue on the paver faces. Weather conditions matter: rain too soon, insufficient activation, or incorrect watering can affect the result. Keep people and pets off the surface for the stated curing period. If the product instructions conflict with generic advice, the product instructions take priority.
Step 10: Inspect the Surface and Maintain It
When the installation is complete, check for rocking pavers, open joints, uneven edges, and areas where water remains after rainfall. Confirm that the patio falls in the intended direction and that runoff does not enter the house or create a problem next door. A few small adjustments made early are easier than repairing a larger settled area later.
Keep the patio clean with a broom and water as appropriate for the paver product. Remove leaves and organic debris before they stain. Replenish joint sand when it drops below the level recommended by the manufacturer. Avoid harsh cleaning chemicals or high-pressure washing unless the paver and joint-sand manufacturers approve them. Aggressive pressure can remove joint material and may damage the surface.
Sealing is optional for many concrete paver patios. It can change color and sheen, affect slip resistance, and create maintenance obligations. Use only a sealer approved for the paver type and joint material, and test a discreet area first. A sealer does not correct poor drainage, loose edges, or a weak base.
Common Beginner Mistakes to Avoid
Skipping the base or making it too thin. A thin layer of sand over soil may look acceptable at first, but it is not the same as a compacted aggregate foundation. The base depth should be based on the site and use, not on a desire to reduce digging.
Compacting the entire base in one deep lift. Compaction equipment works to a limited depth. Build the base in layers that the equipment can properly compact, then check the surface and grade between lifts.
Using the wrong sand. Bedding sand forms the setting layer. Joint sand fills the gaps above. Play sand, loose masonry sand, stone dust, and unspecified products should not be substituted without approval from the paver manufacturer.
Ignoring drainage. A patio that sends water toward the foundation can create moisture problems. A surface that directs water into a neighboring property can create a different problem. Plan the outlet for runoff before digging.
Leaving out edge restraints. Without a firm perimeter, the pavers can spread and joints can open. Secure the restraint to the supporting base as directed.
Paving over soft or wet ground. A weak subgrade can continue to move under the patio. Stop and resolve the cause rather than hiding the problem under additional sand.
Making the design too complicated for the first project. Curves, tight insets, multiple paver sizes, and narrow borders increase measuring and cutting. A simpler shape is easier to build and usually creates less waste.
How Long Does a DIY Paver Patio Take?
The schedule depends on patio size, weather, soil, delivery access, and the experience of the people doing the work. A small, simple patio may fit into several work sessions, but excavation and base preparation can take longer than expected. Rain can delay compaction and bedding work. Material delivery, utility marking, and any permit review must happen before the physical installation starts.
Do not rush the base to meet a weekend deadline. If the subgrade is wet or the aggregate is not compacted properly, pause and resume when conditions are suitable. The most visible part, laying the pavers, is only one stage in a much longer sequence. It is better to finish the foundation correctly than to complete the surface quickly and have to rebuild it.
What Affects the Cost of a Paver Patio?
The main cost drivers are the patio's square footage, paver selection, base depth, aggregate delivery, excavation and disposal, access for equipment, edge restraint, cutting, and optional finishing. A site with poor access may cost more because materials must be moved farther by hand. Clay, roots, rocks, buried services, steep grades, and drainage corrections can also add labor or materials.
Compare quotes using the same scope. Ask whether the price includes utility locating coordination, excavation, disposal, geotextile if specified, compacted base thickness, bedding sand, edge restraints, joint sand, compaction, cuts, and cleanup. A low quote that omits a proper base or perimeter support is not a like-for-like comparison. For a DIY project, request a written material takeoff from the paver supplier and confirm what the delivery quantity means before paying.
When to Hire a Professional Instead
Bring in a qualified hardscape installer or drainage specialist when the site has a steep slope, retaining-wall requirements, soft or saturated soil, repeated water intrusion, a nearby basement or window well, complicated utility routes, large trees with important roots, or a planned surface for vehicle traffic. Professional design is also sensible where the patio is raised, close to a pool, connected to steps, or part of an accessibility route with specific slope and transition requirements.
A professional can assess subgrade conditions, determine whether a thicker or different base is required, plan drainage, and select restraints and materials for the actual site. Homeowners can still contribute by choosing the location, measuring furniture clearances, selecting paver colors, and comparing proposals. Knowing the installation sequence makes it easier to understand what a good quote should include.
Frequently Asked Questions
Can a beginner build a paver patio?
A simple, ground-level patio with a rectangular layout and pedestrian use can be a reasonable project for an experienced adult with suitable help and equipment. The digging, compaction, lifting, and cutting stages are physically demanding. Complex sites, drainage concerns, retaining walls, and vehicle loads should be professionally designed or installed.
What should go under patio pavers?
A conventional flexible paver patio typically uses compacted native soil, a compacted crushed-aggregate base, and a thin bedding-sand layer below the pavers. The perimeter needs an appropriate edge restraint, and the joints are filled with a compatible jointing material. The precise section depends on soil, climate, load, paver product, and manufacturer guidance.
How deep should the gravel base be for a paver patio?
A common planning range for pedestrian patios is 4 to 6 inches of compacted aggregate. CMHA lists 4 inches as a minimum for pedestrian applications under ideal conditions. Weak soil, poor drainage, or freezing conditions can require more. Confirm the depth for the actual property instead of treating one number as universal.
Do I need sand under pavers?
Many conventional concrete paver systems use a thin bedding layer of specified coarse sand, often about 1 inch. It is not a thick cushion and should not be used to correct an uneven base. Follow the paver manufacturer's specified bedding material and depth.
Should a paver patio slope away from the house?
Yes, a patio near a home should be designed so water drains away from the structure and toward an appropriate drainage destination. The exact slope depends on the site, surface system, local requirements, and available drainage route. Do not direct runoff toward a neighbor or an area that already floods.
Can I install pavers directly on dirt?
That is not the standard method for a durable conventional patio. Placing pavers directly on soil can lead to uneven settlement, movement, and persistent weeds. A purpose-designed dry-laid or permeable system may use different layers, but it still requires an engineered or manufacturer-approved foundation.
Is polymeric sand necessary?
Not for every installation. Some patios use ordinary jointing sand, while others use a compatible polymeric product. Choose according to the paver material, joint width, climate, and manufacturer's instructions. Polymeric sand must be installed and activated correctly, so it is not automatically the better choice for every patio.
Do I need to seal a paver patio?
No. Sealing is optional for many concrete paver installations. It may change appearance and maintenance needs, so confirm compatibility with the paver and joint material. Proper base preparation, drainage, and edge restraint matter far more to structural performance than sealer.
Should I call 811 before building a small patio?
Yes. Contact 811 before any excavation, even for a relatively shallow outdoor project, and follow the state one-call center's timing and marking instructions. Public utility marking may not include private irrigation, lighting, or other homeowner-installed lines, so identify those separately.
A Practical Final Checklist
Before ordering, confirm the dimensions, paver pattern, product coverage, material takeoff, finished height, and drainage plan. Before digging, confirm permits or HOA requirements, complete the 811 process, and identify private lines. Before laying pavers, verify the subgrade, compacted base, edge restraints, and bedding layer. Before finishing, check alignment, cuts, joint fill, manufacturer-approved compaction, and water flow. These checks take time, but they are what help a beginner's patio look orderly and perform as intended.
Sources and Further Guidance
- Concrete Masonry & Hardscapes Association: Proper Concrete Paver Base and Depth
- Oregon State University Extension: 10-Step Guide to Installing Pavers
- Concrete Masonry & Hardscapes Association: Edge Restraints for Interlocking Concrete Pavements
- Lowe's: Paving a Patio, How to Lay Pavers for a DIY Patio
- Belgard: Paver and Wall Installation Guidelines
- U.S. Department of Transportation: Call 811 Before You Dig
- OSHA: Protecting Workers, Construction Personal Protective Equipment
Sources
- Concrete Masonry & Hardscapes Association: Proper Concrete Paver Base and Depth. Checked November 4, 2026
- Oregon State University Extension: 10-Step Guide to Installing Pavers. Checked November 4, 2026
- Concrete Masonry & Hardscapes Association: Edge Restraints for Interlocking Concrete Pavements. Checked November 4, 2026
- Lowe's: Paving a Patio, How to Lay Pavers for a DIY Patio. Checked November 4, 2026
- Belgard: Paver and Wall Installation Guidelines. Checked November 4, 2026
- U.S. Department of Transportation: Call 811 Before You Dig. Checked November 4, 2026
- OSHA: Protecting Workers, Construction Personal Protective Equipment. Checked November 4, 2026
Share this article
Get new guides by email
Practical home articles and free resources. No spam, and you can unsubscribe at any time.
Keep reading

Boho Small Patio Decorating Ideas for a Cozy Balcony
Explore boho small patio decorating ideas for a cozy balcony, including woven seating, outdoor rugs, plants, privacy, lighting, and renter-friendly layouts.
November 2026, 23 min read
Stenciled Concrete Patio Makeover: A Before-and-After Design Guide
A stenciled patio can make a plain concrete slab feel like a patterned outdoor room without adding tile. The most convincing results come from restrained.
October 2026, 4 min read
Patio Drainage and Materials: What Happens to the Water
A solid patio sheds every drop of rain that falls on it. Permeable materials let water soak through instead. Here is how each type works, based on EPA and state stormwater guidance, and how to think about the trade-offs.
September 2026, 4 min read